
There is a vegetable that sits in grocery stores and farmers markets every fall and winter looking beautiful and intimidating in equal measure — large, oddly shaped, with a thick skin that makes people pick it up, consider it for a moment, and then put it back down in favor of something easier.
This article is here to tell you — stop putting it back down.
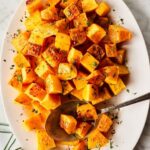
Butternut squash is one of the most rewarding vegetables you can cook. Sweet, nutty, deeply savory when roasted, and versatile enough to work as a side dish, a soup base, a pasta sauce, a salad topping, a grain bowl component, or the star of its own meal. It is also genuinely forgiving — hard to overcook, hard to under-season, and hard to make look bad once it comes out of the oven with those golden, caramelized edges.
The roasting method in this recipe is the simplest and most delicious approach to butternut squash that exists. Thirty-five minutes. One pan. A handful of pantry ingredients. And a result that makes people ask for seconds before they have finished their first serving.
Let’s make it. 🙂
Why Roasting Is the Best Way to Cook Butternut Squash
Roasting Creates Caramelization That No Other Method Achieves
Butternut squash contains natural sugars — a significant amount of them — and when those sugars hit the dry heat of a hot oven on a sheet pan they caramelize. The exterior edges turn golden and slightly crispy. The cut surfaces develop a deep, sweet, almost nutty flavor that raw or steamed squash simply does not have. This caramelization is the entire reason roasted butternut squash tastes so dramatically better than boiled or microwaved squash — the Maillard reaction and caramelization together create a depth of flavor that is impossible to achieve with wet heat methods.
The Texture Is Perfect
Properly roasted butternut squash has a texture that is simultaneously soft and slightly firm — tender enough to eat with a fork without effort but not mushy or watery. The exterior has slight crispiness at the edges while the interior is creamy and smooth. This textural range makes it satisfying in a way that boiled squash — uniformly soft and slightly waterlogged — never quite achieves.
It Is Completely Hands Off
Cut it, season it, put it in the oven, set a timer. There is no stirring, no watching, no adjusting heat. The oven does everything. This makes roasted butternut squash one of the most practical vegetable side dishes for any meal — it cooks unattended while you prepare everything else.
Preparing Butternut Squash — The Part That Intimidates People
The thick skin and awkward shape of butternut squash is what makes most people hesitate. Here is exactly how to handle it safely and efficiently.
The stability problem — a whole butternut squash is round on one end and long on the other with no flat surface, which makes it roll unpredictably when you try to cut it. The solution is simple — cut off both ends first creating two flat surfaces, then stand the squash upright on its flat base. Now it is completely stable and safe to cut.
Peeling — use a sharp vegetable peeler or a sharp knife. The skin is thick but peels away in long strips with a sharp peeler. Work from top to bottom following the curve of the squash. Some people roast butternut squash with the skin on — sliced into half-moons or wedges — and peel after roasting when the skin separates easily from the softened flesh. Both approaches work — peeling before is easier to eat, peeling after is easier to prep.
The most efficient approach for cubed squash — cut off both ends. Peel with a vegetable peeler. Cut in half lengthwise. Scoop out the seeds and stringy fibers with a large spoon — a grapefruit spoon or melon baller works particularly well. Cut into cubes of your desired size.
For halved roasted squash — cut off just the stem end. Cut in half lengthwise. Scoop out seeds and fibers. Season the cut surface and roast cut-side down for the first half of cooking then cut-side up for caramelization.
A microwave shortcut for peeling — pierce the whole squash several times with a fork and microwave for three to four minutes. The brief heat softens the skin slightly making it significantly easier to peel and cut. This technique saves meaningful prep time and reduces the effort of cutting through the hard raw squash.
Knife safety — always use the sharpest knife you have. A dull knife requires more force and is far more likely to slip than a sharp one. A sharp chef’s knife cuts through butternut squash with surprisingly little resistance.
What Goes Into This Recipe
Easy Roasted Butternut Squash
Ingredients
- 1 medium butternut squash (approximately 900g — 1kg)
- 2 tbsp extra virgin olive oil
- 1 tsp salt
- ½ tsp black pepper freshly cracked
- 1 tsp garlic powder
- 1 tsp smoked paprika
- ¼ tsp cinnamon (optional)
- Pinch of red chili flakes (optional)
Optional finishing touches:
- 1 tbsp honey or maple syrup (drizzle in last 5 minutes)
- Fresh rosemary or thyme sprigs (add after roasting)
- 2 tbsp freshly grated parmesan (add in last 5 minutes)
- Squeeze of fresh lemon juice (add after roasting)
Instructions
- Preheat oven to 220°C. Line a large baking sheet with parchment paper or lightly oil the bare pan.
- Prepare the squash — cut off both ends to create flat surfaces. Stand upright on the flat base for stability. Peel with a sharp vegetable peeler removing all green patches. Cut in half lengthwise. Scoop out seeds and stringy fibers with a large spoon. Cut into 2–3cm cubes — as uniform in size as possible.
- Pat the cut squash pieces completely dry with paper towel. Any surface moisture prevents caramelization.
- Place dried squash cubes in a large bowl. Drizzle with olive oil and toss thoroughly until every surface is lightly coated. Add salt, pepper, garlic powder, smoked paprika, cinnamon, and chili flakes if using. Toss again until every piece is evenly coated in the seasoning.
- Spread squash in a single layer on the prepared baking sheet. Leave at least 2cm between each piece — do not crowd. Use two sheet pans if needed. Crowded squash steams instead of roasting.
- Roast at 220°C for 15 minutes. Remove from oven and flip every piece using a spatula or tongs. Return to oven.
- Roast for a further 15–20 minutes until the squash is tender all the way through when pierced with a fork and the surfaces are golden and caramelized with slightly darker edges.
- If using honey or maple syrup — drizzle over the squash in the last 5 minutes of roasting and return to the oven. If using parmesan — scatter over the squash in the last 5 minutes.
- Remove from oven. Add any fresh herbs immediately — the residual heat releases their aromatic oils perfectly. Add a squeeze of lemon if desired.
- Transfer to a serving plate or bowl. Serve immediately as a side dish or store in an airtight container for meal prep use throughout the week.
Butternut squash — one medium squash approximately 900g to 1kg feeds four people as a side dish. Look for a squash that feels heavy for its size — heavier means more dense, flavorful flesh. The skin should be uniformly tan-beige without green patches — green patches indicate the squash was picked before fully ripening and the flesh will be less sweet and flavorful. A firm squash with no soft spots or blemishes is what you want.
Extra virgin olive oil — used generously to coat every surface of the squash. The olive oil is what enables the caramelization — dry squash without oil does not brown properly and dries out in the oven. Use enough to coat every piece thoroughly — approximately two tablespoons for a medium squash. Toss well so every surface is glistening.
Salt — seasons the squash and draws out a small amount of moisture which concentrates the flavor. Season more generously than you think necessary — butternut squash needs proper seasoning to taste its best and underseasoned squash tastes flat regardless of how well it is cooked.
Black pepper — freshly cracked. Adds warmth and complexity that balances the natural sweetness of the squash.
Garlic powder — adds savory depth without the risk of fresh garlic burning at the high roasting temperature. Fresh minced garlic added directly to butternut squash tends to burn before the squash is fully cooked — garlic powder avoids this problem entirely while still providing garlic flavor throughout.
Smoked paprika — the spice that takes roasted butternut squash from good to genuinely outstanding. A small amount adds a subtle smokiness and warmth that complements the natural sweetness of the squash in a way that feels sophisticated and restaurant-quality. It also gives the roasted squash a beautiful deep orange-red color that makes it look stunning on a plate.
Cinnamon — optional but genuinely excellent. A small pinch of cinnamon in the seasoning mix plays to the natural sweetness of butternut squash and adds a warm, slightly spiced quality that is particularly good in fall and winter. Start with a very small amount — cinnamon can dominate quickly.
Fresh herbs — added after roasting never before. Fresh rosemary, thyme, sage, or parsley added to hot roasted squash immediately after it comes out of the oven adds an aromatic freshness that dried herbs cannot replicate. The heat from the squash gently wilts the fresh herbs releasing their oils without cooking them to bitterness.
Optional — honey or maple syrup — a small drizzle over the squash in the last five minutes of roasting creates a caramelized, slightly sticky glaze that amplifies the natural sweetness and creates an irresistibly glossy finish. This addition transforms the squash from a straightforward roasted vegetable into something that feels almost indulgent.
Optional — red chili flakes — a pinch added to the seasoning mix creates a sweet-heat combination that is genuinely addictive. The contrast of the sweet squash and the gentle background heat from the chili is one of the great vegetable flavor combinations.
The Seasoning Variations That Make This Versatile
Classic savory — olive oil, salt, pepper, garlic powder, smoked paprika. The version that works with everything and pleases everyone. Clean, straightforward, deeply savory with a slight smokiness.
Sweet and spiced — olive oil, salt, cinnamon, nutmeg, a drizzle of maple syrup. The cozy autumn version that leans into the natural sweetness of the squash. Particularly good as a side for roast chicken or pork.
Herb and garlic — olive oil, salt, pepper, fresh thyme, fresh rosemary, and whole garlic cloves roasted alongside the squash. The garlic cloves become sweet and jammy during roasting — squeeze them out of their skins and mix with the squash for an intensely garlicky, herby result.
Mediterranean — olive oil, salt, cumin, coriander, turmeric, and a squeeze of lemon juice after roasting. The warm spice combination gives the squash a Middle Eastern character that works beautifully in grain bowls and alongside hummus and flatbread.
Parmesan and herb — toss the cubed squash with olive oil and seasoning as normal then scatter freshly grated parmesan over the squash in the last five minutes of roasting. The parmesan melts and forms a slightly crispy, savory coating on the squash that is absolutely outstanding.
Balsamic glazed — drizzle a tablespoon of good quality balsamic vinegar over the squash in the last five minutes of roasting. The balsamic reduces and creates a sweet-acidic glaze that pairs particularly well with the natural sweetness of the squash and the smokiness of the paprika.
The Roasting Technique — How to Get Perfect Results
Cut size matters — the most important variable in roasting butternut squash is the size of the pieces. All pieces must be cut to the same size for even cooking. Approximately 2–3cm cubes is the ideal size for roasted butternut squash — large enough to have substance and hold their shape through roasting, small enough to cook through completely and caramelize well within thirty to thirty-five minutes. Larger cubes need more time. Smaller cubes risk burning at the edges before the center is cooked through.
Do not crowd the pan — this is the single most impactful roasting technique and the most commonly ignored. Squash pieces that are crowded together on the pan create steam — the moisture evaporating from adjacent pieces prevents any piece from developing caramelization. The result is soft, steamed squash with pale surfaces rather than golden, caramelized edges. Use two sheet pans if necessary to give every piece adequate space — at least 2cm between each piece. Space equals caramelization. Crowding equals steaming.
Use a high oven temperature — 220°C. The high temperature is what drives caramelization. A lower temperature produces softer squash with less browning and less flavor development. 220°C produces golden edges, slightly crispy surfaces, and deep caramelized flavor in the correct amount of time.
Do not line the pan with too much parchment — a light sheet of parchment or a lightly oiled bare pan works best. Heavy layers of foil or parchment can trap steam underneath the squash and prevent the bottom surface from caramelizing properly. A bare oiled pan or light parchment is ideal.
Flip halfway — at the fifteen-minute mark flip every piece of squash so the second surface can caramelize. Both sides should be golden before the squash is done. This single step doubles the caramelized surface area and significantly improves the flavor of the finished dish.
Check for doneness — the squash is done when it is tender all the way through when pierced with a fork and the exposed surfaces are golden and caramelized. The edges should be slightly darker than the center surfaces. Total time at 220°C is approximately thirty to thirty-five minutes for 2–3cm cubes.
How to Use Roasted Butternut Squash
Roasted butternut squash is one of the most versatile cooked vegetables you can have prepared in your fridge. Here are the best applications.
As a simple side dish — serve warm directly from the oven alongside any protein. Particularly excellent with roast chicken, pork tenderloin, grilled salmon, or a simple green salad. The sweetness and warmth of the squash complements almost any main.
In a grain bowl — add warm or cold roasted squash to a bowl of quinoa, farro, or brown rice. Top with arugula, dried cranberries, pumpkin seeds, crumbled goat cheese, and a maple-dijon vinaigrette. This combination is one of the most satisfying and nutritionally complete bowl meals possible.
In a salad — warm roasted squash on a bed of arugula or spinach with candied pecans, goat cheese or feta, thinly sliced red onion, and a balsamic vinaigrette. The warm squash slightly wilts the greens and the combination of sweet, salty, creamy, and tart is genuinely outstanding.
As a pasta sauce — blend roasted butternut squash with chicken stock, a small amount of cream, sage, and parmesan until completely smooth. Toss with cooked pasta for a silky, deeply flavored sauce that tastes rich and indulgent while being primarily vegetable-based. This is one of the best pasta sauces for autumn and winter.
In soup — blend roasted butternut squash with sautéed onion, garlic, and chicken or vegetable stock. The roasting adds a depth of flavor to butternut squash soup that cooking the squash directly in the soup pot cannot achieve. A swirl of cream and a sprinkle of pumpkin seeds on top makes it genuinely beautiful.
On pizza — spread over pizza dough with ricotta, caramelized onion, fresh sage, and mozzarella. The sweetness of the squash against the richness of the cheese is a classic autumn pizza combination.
In tacos — seasoned with cumin, chili powder, and lime and used as the filling in vegetarian tacos with black beans, pickled onion, and avocado crema. Surprisingly excellent and one of the best vegetarian taco options.
In risotto — fold roasted butternut squash into risotto in the last few minutes of cooking. The squash breaks down slightly into the creamy rice creating pockets of sweet flavor throughout. Add crispy fried sage and parmesan on top.
Meal Prep and Storage
Roasted butternut squash is one of the best meal prep vegetables available — it stores well, reheats beautifully, and works in so many applications that a batch cooked on Sunday provides multiple meals throughout the week with almost no additional effort.
Storage — store in an airtight container in the fridge for up to five days. The flavor actually improves slightly over the first two days as the caramelized sugars continue to develop.
Reheating — the best reheating method is a hot pan with a small amount of olive oil for two to three minutes — this restores the slight crispiness of the exterior that refrigeration removes. The microwave works but produces a softer result. The oven at 200°C for five to eight minutes is excellent for reheating larger quantities.
Freezing — roasted butternut squash freezes well for up to three months. Freeze in a single layer on a parchment-lined tray first then transfer to a zip-lock bag once frozen. This prevents the pieces from freezing together in a solid block. Thaw overnight in the fridge and reheat as above.
Raw prepared squash — peeled and cubed raw butternut squash can be stored in an airtight container in the fridge for up to three days before roasting — useful for reducing prep time on busy weeknights.
Variations Using Roasted Butternut Squash
Butternut squash soup — the most popular butternut squash recipe on Pinterest. Roast the squash first then blend with sautéed onion, garlic, chicken stock, and a touch of cream for the most deeply flavored soup imaginable. Top with crème fraîche, pumpkin seeds, and chili oil.
Stuffed butternut squash — halve the squash lengthwise and roast cut-side down for twenty minutes. Flip and fill the cavity with a mixture of wild rice, dried cranberries, pecans, goat cheese, and fresh herbs. Return to the oven for fifteen minutes. A complete, stunning meal in a vegetable shell.
Butternut squash pasta — blend roasted squash into a creamy sauce with sage-infused butter, parmesan, and pasta water. Toss with cooked pasta. One of the most satisfying autumn pasta dishes possible.
Butternut squash curry — add roasted squash to a coconut milk curry with chickpeas, spinach, and warming spices. The squash absorbs the curry flavors beautifully and its natural sweetness balances the heat of the spices.
Butternut squash hummus — blend roasted squash with chickpeas, tahini, lemon, and garlic for a seasonal hummus variation that is stunning in color and flavor. Serve with warm pita and za’atar oil drizzled over the top.
Common Mistakes to Avoid
Not drying the squash before seasoning. Any surface moisture prevents caramelization. Pat the cut squash pieces dry with paper towel before tossing with oil and seasoning.
Crowding the pan. The most impactful mistake. Crowded squash steams rather than roasts and never develops golden caramelized edges. Use two pans if necessary — space is essential.
Using too low a temperature. Below 200°C butternut squash takes too long to caramelize and can become soft and mushy before developing color. Always use 220°C for roasting.
Cutting pieces unevenly. Inconsistent sizes mean some pieces are overcooked and mushy while others are still firm and undercooked. Take an extra two minutes to cut everything to the same size.
Not flipping halfway. The bottom surface caramelizes in contact with the hot pan. Flipping exposes the second surface and doubles the caramelized area — significantly improving the flavor of the finished squash.
Adding fresh herbs before roasting. Fresh herbs burn at 220°C. Always add fresh herbs after the squash comes out of the oven — the residual heat is sufficient to release their aromatic oils without cooking them to bitterness.
Final Thoughts
Butternut squash does not deserve its reputation for being difficult or intimidating. It is one of the most forgiving, most delicious, most versatile vegetables you can cook — and the simple roasting method in this recipe produces results that make people rethink everything they thought they knew about vegetable side dishes.
Sweet. Caramelized. Deeply savory. Golden at the edges. Tender all the way through.
Buy one this week. Cut it up. Toss with olive oil and the seasonings that sound best to you. Put it in a hot oven. Come back in thirty-five minutes.
You will not put it back on the shelf again. 🙂
FAQ
Do I have to peel butternut squash before roasting? No — you can roast butternut squash with the skin on, particularly when cutting into wedges or half-moons. The skin becomes slightly softer during roasting and is edible though most people find it slightly tough. For cubed squash peeling before is more practical as the skin makes even cubing more difficult. Roasting halved squash cut-side down with the skin on is perfectly fine — the skin peels away easily after cooking.
Why is my roasted butternut squash mushy and not caramelized? Two most common reasons — the pan was overcrowded which caused steaming rather than roasting, or the oven temperature was too low. Make sure pieces have adequate space between them on the pan and use 220°C. Also ensure the squash pieces are patted dry before seasoning — surface moisture inhibits caramelization.
Can I roast butternut squash from frozen? Yes — frozen raw butternut squash cubes can go directly from frozen onto the baking sheet. Add approximately 10 extra minutes to the roasting time and be prepared for slightly more moisture during cooking. The result is slightly less caramelized than fresh but still very good.
How do I know when butternut squash is fully cooked? Pierce the thickest piece with a fork or the tip of a sharp knife — it should slide in with almost no resistance. The exterior surfaces should be golden and caramelized with slightly darker edges. If the surfaces are golden but the center still feels firm return to the oven for five more minutes and test again.
Can I prepare butternut squash in advance? Yes — peel and cube the squash up to three days in advance and store in an airtight container in the fridge. The cut squash will not discolor the way apple or avocado does. Season and roast when ready. This makes weeknight roasting significantly faster.
What is the difference between butternut squash and pumpkin in recipes? Both are winter squashes with similar flavor profiles — sweet, nutty, and slightly earthy. Butternut squash is generally sweeter and has a denser, less watery flesh than most cooking pumpkins. They are interchangeable in most recipes. Butternut squash tends to roast more evenly and produce a creamier result in soups and purees than standard carving pumpkins which are grown for size rather than flavor.